 Iktiup Mahmud
· 5 min read
Self-hosting your apps on a VPS with Coolify
How I turn a cheap VPS into my own Heroku with Coolify - server setup, hardening, git-push deploys, HTTPS, databases and backups, plus the mistakes worth avoiding.
- #vps
- #coolify
- #docker
- #self-hosting
- #devops

Managed platforms are great until the invoice arrives. A side project with a web app, an API, a Postgres database and a Redis instance can easily cost more per month on a PaaS than a VPS that could run ten of them.
The catch has always been the work: installing Docker, writing reverse-proxy configs, renewing certificates, wiring up deploys. Coolify removes most of that. It is an open-source, self-hostable alternative to Heroku, Netlify and Vercel: you install it on your own server and get a dashboard with git-push deploys, automatic HTTPS, one-click databases and scheduled backups.
This is the setup I use on providers like Hetzner, Contabo and DigitalOcean.
What you get
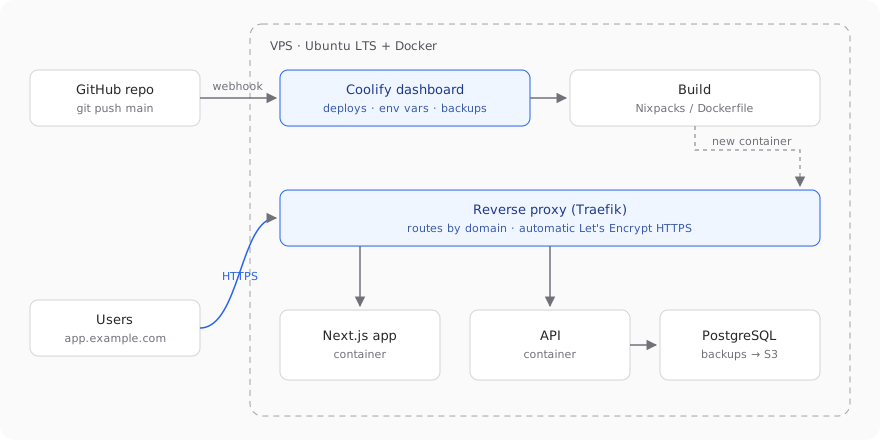 Everything runs on one VPS: Coolify, the reverse proxy and your containers
- Coolify dashboard - manages projects, environments, environment variables and deploys.
- A reverse proxy (Traefik by default) - routes each domain to the right container and issues Let's Encrypt certificates automatically.
- Your apps as containers - built from your repository with Nixpacks, a Dockerfile or a Docker Compose file.
- Databases - PostgreSQL, MySQL, MongoDB, Redis and more, with scheduled backups to any S3-compatible storage.
1. Pick a VPS
Coolify's minimum is 2 vCPU, 2 GB RAM and 30 GB of disk. That works, but builds happen on the same machine, so I'd start with 4 GB of RAM: a Next.js build alone can take more than a gigabyte.
Choose Ubuntu LTS (22.04 or 24.04). It is the most tested option for Coolify, and every guide you find will assume it.
2. Prepare and harden the server
Before installing anything, lock the server down. Log in as root once, then create a normal user with sudo:
adduser deploy
usermod -aG sudo deploy
Copy your SSH key to the new user (run this from your own machine):
ssh-copy-id deploy@YOUR_SERVER_IPThen disable password logins in /etc/ssh/sshd_config:
PasswordAuthentication no
PermitRootLogin prohibit-password
Coolify connects to the server over SSH as root with its own key, so use prohibit-password rather than no for root: key-based access stays, passwords are off. Restart SSH with sudo systemctl restart ssh, and keep your current session open until you've confirmed a new login works.
Finally, update the system and turn on automatic security updates and fail2ban:
sudo apt update && sudo apt upgrade -y
sudo apt install -y unattended-upgrades fail2ban
sudo dpkg-reconfigure -plow unattended-upgrades
A firewall gotcha: Docker ignores UFW
Most guides tell you to enable ufw and allow only ports 22, 80 and 443. The problem: Docker writes its own iptables rules, and ports published by containers bypass UFW entirely. If a database container publishes port 5432, it is reachable from the internet even though UFW says otherwise.
Two rules keep you safe:
- Use your provider's cloud firewall (Hetzner, DigitalOcean and most others have one). It filters traffic before it reaches the server, so Docker can't bypass it.
- Never make a database public unless you really need to. Apps on the same server talk to it over the internal Docker network.
Open these ports in the cloud firewall:
| Port | Why |
|---|---|
| 22 | SSH |
| 80, 443 | HTTP and HTTPS for your apps |
| 8000 | Coolify dashboard, only until you give it a domain |
| 6001, 6002 | Coolify real-time updates and web terminal |
3. Install Coolify
One command installs Docker and Coolify:
curl -fsSL https://cdn.coollabs.io/coolify/install.sh | sudo bashWhen it finishes, open http://YOUR_SERVER_IP:8000 and create the admin account immediately - the first person to open that page becomes the owner.
Then give the dashboard its own domain. Point a DNS A record such as coolify.example.com to your server IP, set it under Settings → Instance's domain, and Coolify serves the dashboard over HTTPS. Now you can close port 8000.
4. Deploy your first app
- Create a project and an environment (for example
production). - Connect GitHub. Coolify can create a GitHub App for you, which gives it access to private repositories and sets up the push webhook automatically.
- Add a resource and pick your repository and branch.
- Choose a build pack. Nixpacks detects most Node.js, Python, Go and PHP projects without any config. If you already have a
Dockerfileordocker-compose.yml, use that instead - it's more predictable. - Set the domain (for example
https://app.example.com) and add anArecord for it. Coolify requests the certificate on the first deploy. - Add environment variables and hit Deploy.
From then on, every push to the branch triggers a deploy:
 Push to main, Coolify builds on the server, checks health and switches traffic
Configure a health check for each app. With a health check in place, Coolify starts the new container, waits until it's healthy, and only then removes the old one - a rolling update with no downtime. Without one, you can get a short gap during every deploy.
5. Databases and backups
Add a database from + New → Database. Coolify gives you an internal connection string such as:
postgres://postgres:PASSWORD@my-postgres:5432/postgresUse that internal URL in your apps. It never leaves the server, so the database doesn't need a public port.
Then set up scheduled backups: add an S3-compatible destination (AWS S3, Cloudflare R2, Backblaze B2, or Hetzner Object Storage) under Storages, pick a schedule like daily at 03:00, and choose how many backups to keep.
A backup you've never restored is only a hope. Once a month, restore the latest backup into a scratch database and check that the data is really there.
6. Things I learned the hard way
- Build on the server, but watch memory. If builds get killed, add swap (2-4 GB) or build images in GitHub Actions, push them to a registry, and let Coolify deploy the image instead of building it.
- Set resource limits. One runaway container shouldn't take down everything else. Coolify lets you cap CPU and memory per resource.
- Clean up old images. Every deploy leaves images behind. Enable Coolify's automatic Docker cleanup, or disks fill up quietly.
- Keep Coolify itself updated, but read the release notes first. It moves fast.
- Separate staging from production. Use a second environment, or even a second small server, instead of testing on the one your users hit.
When not to use it
A single VPS is a single point of failure. If an app must survive a server dying at 3 a.m., you need more than one machine, managed databases, or Kubernetes. Coolify does support multiple servers, but at that point, weigh the operational work honestly.
For side projects, portfolios, internal tools, MVPs and early-stage products, though, a VPS with Coolify is hard to beat: a few dollars a month, deploys as simple as git push, and full control over your own infrastructure.